
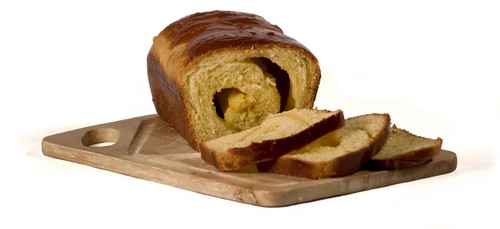
Our talented friend Kyle recently finished baking school this year. He was kind enough to join us this weekend for the blog. We were excited, as this was our first time to see Kyle 'in action' and we'd heard such good things. Together, we decided to make a Belgian bread called a craquelin. It is a brioche with orange flavored sugar cubes, that give the bread a nice crunch, hence the name craquelin! Kyle has scaled down and adapted the classic recipe to suit the home oven. We made the bread in loaf pans, in the style of a swirl bread. This bread is great warm and also cold (when the sugar crystallizes and gets crunchy). While this is probably the most time-consuming recipe on this blog so far, Kevin says this bread is his favorite so far. Indeed, the bread was worth it. Buttery, sweet with a great orange zing. So we thank Kyle so much for his expertise, we definitely hope to have him cooking with us again in the future! This timely blog post is our contribution to the Waiter There's Something In My... Bread food blogging event hosted by Spittoon Extra. The roundup can be found here.
500g unbleached all-purpose flour (about 4 cups)
50g cold water (1/4 cup)
70g sugar (1/3 cup)
250g cold eggs (5 whole large eggs plus one yolk)
12g salt (2 tsp fine sea or table salt)
250g cold unsalted butter (2 sticks plus 2 Tbs = 18 Tbs)
30g fresh yeast or 12g instant yeast (such as "RapidRise" -- 1 and
3/4 packets)
1 small box sugar cubes
zest of 3 oranges
1/4 cup orange liqueur (Grand Marnier, Cointreau, etc)
1 egg, beaten (for egg wash)
Special equipment needed:
stand mixer with dough hook
two 9" x 5" (1 lb.) nonstick loaf pans
pastry brush
- Add eggs and water to mixer bowl. Sprinkle yeast on top, then add flour.
- Mix on lowest speed for about two minutes until the flour is evenly hydrated.
- Add salt and sugar. Mix at lowest speed for another two minutes until well incorporated.
- Increase mixer speed to next setting. Mix until dough is well developed. The dough should pull away from the bowl and have a smooth appearance. When tugged on, it should feel stretchy, and you should be able to make a good "window" in the dough. Depending on your mixer and your dough, this could take anywhere from 2 to 10 minutes.
- Using a rolling pin, or some other heavy object, pound the cold butter to soften it. It is important than the butter not get too warm or it will melt.
- With the mixer on the lowest speed, slowly add the butter, about one tablespoon at a time, until it is all incorporated into the dough. Do not add the next piece until the previous piece has been fully incorporated. This can take anywhere from 10 to 20 minutes.
- The dough should now appear smooth and feel soft and elastic. Move it to an oiled container that is at least three times as big as the dough. Cover the container with plastic wrap or a lid. Do not cover with a towel and do not press the plastic directly against the dough. Let sit for one hour at room temperature.
- While the dough is rising, combine the zest and orange liqueur. Pour mixture over sugar cubes and mix to evenly distribute the liqueur and orange zest. Let the sugar cubes macerate while the dough rises.
- After the dough has risen for one hour, lightly dust the top with flour then turn it out onto the counter. Gently press the dough down with the palms of your hands to eliminate any large air bubbles. Using both hands with your fingertips touching, reach under the far edge of the dough. Fold that third into the center. Fold the near edge third towards the center. Turn 90 degrees and repeat folding thirds to the center. Return the dough to the bowl with the seam side down and the tighter, smooth side up. Cover and let sit for another 45 minutes.
- After 45 minutes, turn your dough back onto the counter and cut into two. Working with one half at a time, use your palm to gently press the dough down to remove any large bubbles. Gather the dough into the center by grabbing the edges and pulling them towards the center, like making a bundle out of a handkerchief. The dough should stick to itself. You should have a loose ball. Turn it over and cupping the ball with your thumbs and fingers, roll the ball against the counter to tighten it. If you see the surface of the dough tearing, stop, you are overtightening it. Repeat with the second ball of dough. This is called preshaping the dough and helps build structure in the final loaf.
- Allow the dough to relax for 5 minutes. Working with one piece at a time, lightly flour your work surface and using your hands or a lightly floured rolling pin press the dough out into a rectangle about 9 inches wide (as wide as your loaf pan is long) and 18 inches long. Be gentle! We don't want to press all the air out of the dough.
- Take about half your sugar cubes and gently press them in an even layer into the surface of the dough, leaving a one inch blank space at one of the narrow edges.
- Working from the opposite end of the blank space, roll up the dough into a log, making sure to keep the log tight as you go. When the roll is finished, gently pull it against your work surface with your fingers to tighten the log and the seam.
- Lightly oil your loaf pans and place one log, seam side down, into each pan.
- Lightly brush the surface of each loaf with the beaten egg wash.
- Cover each pan with plastic wrap, again, not directly against the surface of the dough. Let sit for 45 minutes to an hour at room temperature. The dough is "proofed" when the dome of it has risen nearly to the top of the pans. While the dough is proofing, preheat your oven to 350 degrees.
- When your dough is proofed, give it a second egg wash then bake for 40 minutes on the middle rack of your oven. You may want to place a foil-lined sheet pan on the next rack down to catch any sugar that may bubble out of the loaf pans. Do NOT open the oven for the first 30 minutes, doing so will decrease your loaf volume.
- Remove to a cooling rack. Let sit 10 minutes in pans, then remove from pans, running a knife around the edge to loosen first. Enjoy warm or let cool thoroughly on racks before wrapping in plastic for storage.


4 comments:
What a superb entry and a great twist on the standard. Thanks for taking part in Waiter hope you will join in future editions!
thanks for the step by step description and all the details given!!
Did you know that the Craquelin originated in Belgium, It's sweet and delicious and we have it for breakfast.
We do not use crushed sugar cube to make it but Belgian pearl sugar for is high resistance to the heat, the only sugar able to react that way is the Belgian pearl sugar made in Belgium, it is very difficult if not impossible to find it outside Belgium, however Get a Waff online store sell it imported straight from Belgium.
You really should try with the pearl sugar. It will make all the difference! Where to find it?
At this address:
http://www.belgianpearlsugar.com
My spouse and I absolutely love your blog and find nearly all of your post’s to be precisely what I’m looking for. Does one offer guest writers to write content for you personally? I wouldn’t mind writing a post or elaborating on a number of the subjects you write in relation to here. Again, awesome website!
Jin
www.imarksweb.org
Post a Comment