Monday, April 23, 2007

Craquelin


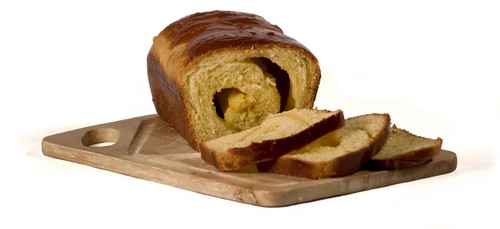
Our talented friend Kyle recently finished baking school this year. He was kind enough to join us this weekend for the blog. We were excited, as this was our first time to see Kyle 'in action' and we'd heard such good things. Together, we decided to make a Belgian bread called a craquelin. It is a brioche with orange flavored sugar cubes, that give the bread a nice crunch, hence the name craquelin! Kyle has scaled down and adapted the classic recipe to suit the home oven. We made the bread in loaf pans, in the style of a swirl bread. This bread is great warm and also cold (when the sugar crystallizes and gets crunchy). While this is probably the most time-consuming recipe on this blog so far, Kevin says this bread is his favorite so far. Indeed, the bread was worth it. Buttery, sweet with a great orange zing. So we thank Kyle so much for his expertise, we definitely hope to have him cooking with us again in the future! This timely blog post is our contribution to the Waiter There's Something In My... Bread food blogging event hosted by Spittoon Extra. The roundup can be found here.

500g unbleached all-purpose flour (about 4 cups)
50g cold water (1/4 cup)
70g sugar (1/3 cup)
250g cold eggs (5 whole large eggs plus one yolk)
12g salt (2 tsp fine sea or table salt)
250g cold unsalted butter (2 sticks plus 2 Tbs = 18 Tbs)
30g fresh yeast or 12g instant yeast (such as "RapidRise" -- 1 and
3/4 packets)

1 small box sugar cubes
zest of 3 oranges
1/4 cup orange liqueur (Grand Marnier, Cointreau, etc)

1 egg, beaten (for egg wash)

Special equipment needed:
stand mixer with dough hook
two 9" x 5" (1 lb.) nonstick loaf pans
pastry brush

  1. Add eggs and water to mixer bowl. Sprinkle yeast on top, then add flour.
  2. Mix on lowest speed for about two minutes until the flour is evenly hydrated.
  3. Add salt and sugar. Mix at lowest speed for another two minutes until well incorporated.
  4. Increase mixer speed to next setting. Mix until dough is well developed. The dough should pull away from the bowl and have a smooth appearance. When tugged on, it should feel stretchy, and you should be able to make a good "window" in the dough. Depending on your mixer and your dough, this could take anywhere from 2 to 10 minutes.
  5. Using a rolling pin, or some other heavy object, pound the cold butter to soften it. It is important than the butter not get too warm or it will melt.
  6. With the mixer on the lowest speed, slowly add the butter, about one tablespoon at a time, until it is all incorporated into the dough. Do not add the next piece until the previous piece has been fully incorporated. This can take anywhere from 10 to 20 minutes.
  7. The dough should now appear smooth and feel soft and elastic. Move it to an oiled container that is at least three times as big as the dough. Cover the container with plastic wrap or a lid. Do not cover with a towel and do not press the plastic directly against the dough. Let sit for one hour at room temperature.
  8. While the dough is rising, combine the zest and orange liqueur. Pour mixture over sugar cubes and mix to evenly distribute the liqueur and orange zest. Let the sugar cubes macerate while the dough rises.
  9. After the dough has risen for one hour, lightly dust the top with flour then turn it out onto the counter. Gently press the dough down with the palms of your hands to eliminate any large air bubbles. Using both hands with your fingertips touching, reach under the far edge of the dough. Fold that third into the center. Fold the near edge third towards the center. Turn 90 degrees and repeat folding thirds to the center. Return the dough to the bowl with the seam side down and the tighter, smooth side up. Cover and let sit for another 45 minutes.
  10. After 45 minutes, turn your dough back onto the counter and cut into two. Working with one half at a time, use your palm to gently press the dough down to remove any large bubbles. Gather the dough into the center by grabbing the edges and pulling them towards the center, like making a bundle out of a handkerchief. The dough should stick to itself. You should have a loose ball. Turn it over and cupping the ball with your thumbs and fingers, roll the ball against the counter to tighten it. If you see the surface of the dough tearing, stop, you are overtightening it. Repeat with the second ball of dough. This is called preshaping the dough and helps build structure in the final loaf.
  11. Allow the dough to relax for 5 minutes. Working with one piece at a time, lightly flour your work surface and using your hands or a lightly floured rolling pin press the dough out into a rectangle about 9 inches wide (as wide as your loaf pan is long) and 18 inches long. Be gentle! We don't want to press all the air out of the dough.
  12. Take about half your sugar cubes and gently press them in an even layer into the surface of the dough, leaving a one inch blank space at one of the narrow edges.
  13. Working from the opposite end of the blank space, roll up the dough into a log, making sure to keep the log tight as you go. When the roll is finished, gently pull it against your work surface with your fingers to tighten the log and the seam.
  14. Lightly oil your loaf pans and place one log, seam side down, into each pan.
  15. Lightly brush the surface of each loaf with the beaten egg wash.
  16. Cover each pan with plastic wrap, again, not directly against the surface of the dough. Let sit for 45 minutes to an hour at room temperature. The dough is "proofed" when the dome of it has risen nearly to the top of the pans. While the dough is proofing, preheat your oven to 350 degrees.
  17. When your dough is proofed, give it a second egg wash then bake for 40 minutes on the middle rack of your oven. You may want to place a foil-lined sheet pan on the next rack down to catch any sugar that may bubble out of the loaf pans. Do NOT open the oven for the first 30 minutes, doing so will decrease your loaf volume.
  18. Remove to a cooling rack. Let sit 10 minutes in pans, then remove from pans, running a knife around the edge to loosen first. Enjoy warm or let cool thoroughly on racks before wrapping in plastic for storage.


Monday, April 16, 2007

Reuben Sandwich


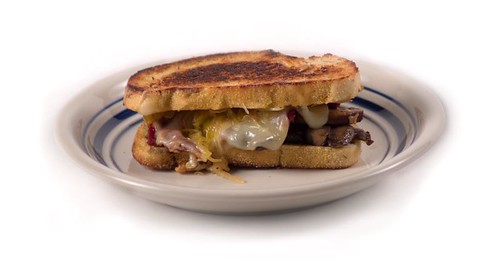
We've been dying to make this vegetarian Reuben. Very quick, easy to make, and was a great dinner. The sandwiches were so good, we decided to make it again for lunch the next day! It was a hit with our omnivore friends, too. Instead of corned beef, we use sauteed mushrooms and sun-dried tomatoes. The sandwich is just bursting with flavor and the tomatoes really complement the tangy sauerkraut and Russian dressing. We actually used this vegan Russian dressing recipe. We cut the amount of oil in half to make the dressing lighter and it turned out very well. Make sure to use a vegetarian Worcestershire sauce.

10 ounces portabello mushrooms, sliced
4 tablespoons vegetable oil
salt and pepper to taste
4 ounces sundried tomatoes, jarred in olive oil, drained
4 ounces sliced Swiss cheese (about 4 slices)
1 heaping cup of sauerkraut
8 slices jewish rye bread
1/2 cup russion dressing
oil for pan toasting

In a large skillet, heat the 4 tablespoons of vegetable oil over medium flame. Add the sliced mushrooms and sautee until cooked. Salt and pepper to taste. Set aside.
Slice the sund-ried tomatoes into strips, about 1/4 inch thick.
On a plate, lay a slice of bread. Place 1/4 of the mushrooms on the bread. Evenly distrubute 1/4 of the sun-dried tomato strips on top of the mushrooms. Top with a slice of Swiss cheese and then 1/4 of the sauerkraut. Spread Russian dressing onto the underside of a second slice of bread and place on top of the sandwich.
Repeat making sandwiches with the rest of the ingredients.
In a pan, heat 2 tablespoons of oil over medium flame. Place sandwich in the pan, and let toast for 3 minutes (or until sufficiently toasted). Carefully flip sandwich and cook other side similarly.
Repeat pan toasting the other sandwiches. Serve immediately and enjoy!

Makes 4 Reuben sandwiches.


Saturday, April 7, 2007

Vegetarian Bastilla


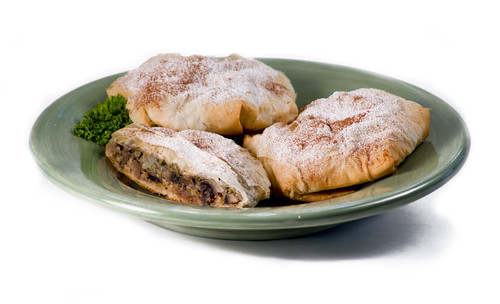
I can remember the first time I tried Bastilla. The combination of savory, sweet and cinnamon was unforgettable. It instantly became is one of our favorite Moroccan dishes. But because it is traditionally made with pigeon (chicken in the America), it's been a long time since we've had it. This month's mingle Arabian Nights reminded me that I should try to create a vegetarian version that we can enjoy. Our version is less time consuming than any of the chicken recipes I've seen online. This is our first mingle, and we're pretty excited. Give it a try and tell us what you think!

3 tablespoons olive oil
12 ounces portabello mushrooms, sliced
1 large onion, diced
1 1/2 teaspoons grated fresh ginger
pinch of saffron
1 1/2 teaspoons ground cinnamon
1/2 cup chopped parsley
1 tablespoon of lemon juice
1/2 cup vegetable broth
4 eggs
salt and pepper to taste
2/3 cups raw sliced almonds
1 tablespoons evaporated cane sugar
1/4 cup oil (for brushing)
1 8-ounce pack of phyllo dough (defrosted)
confectioner's sugar (for garnish)
ground cinnamon (for garnish)

Preheat oven to 400 degrees.
In a pan over medium flame, heat the olive oil.
Add the mushrooms and onions. Cook until onions are just softened. Add the ginger, saffron, 1 teaspoon of cinnamon, lemon juice and chopped parsley.
In a bowl, beat the eggs with the vegetable broth. Pour this mixture into the pan of mushrooms, and stir constantly, until the eggs curdle and are evenly distributed in the mixture and most of the liquid is cooked off. Salt and pepper to taste. Set aside.
Toast the sliced almonds in a frying pan, stirring frequently, until lightly browned. Add the sugar and the remaining 1/2 teaspoon cinnamon, and toss lightly. Let cool. Pulse in food processor until finely ground.
Lightly grease a baking sheet.
Lay 3 sheets of phyllo dough on a plate. Brush oil on the phyllo. Add 2 more sheets and brush with oil.
Place about a half cup of mushroom/egg mixture in the center of the phyllo in about a 5 inch circle. Sprinkle 2 to 3 tablespoons of the ground almonds on top of mushrooms. Fold over the edges of the dough over the filling to complete enclose. Brush the seams with more oil, and place seam side down onto the baking sheet. Brush the top with more oil.
Continue with the rest of the filling and dough.
Bake for 25 minutes or until the pastry is golden and crisp.
Lightly dust with confectioner's sugar and cinnamon.

Makes 4 medium sized bastilla.


Tuesday, April 3, 2007

Mint Chocolate Ganache & Chocolate Frosting

This is based on your basic ganache recipe. Ganache at room temperature can be used to pour over cakes for a smooth shine. Chill the ganache and whip it up for a rish frosting. Chill for longer and use for truffle fillings. I used plain chocolate ganache for the frosting, and mint chocolate ganache for the outer glaze on a mint chocolate cake for Kevin's birthday. It's a good idea to smooth frosting over any rough edges of the cake before pouring over the ganache glaze.

Chocolate Frosting


6 ounces semisweet chocolate chips
3 ounces 70% dark chocolate
1 cup heavy cream
1 tablespoon dark rum

Place all the chocolate into a medium bowl. Heat the cream in a small sauce pan over medium heat. Bring to a boil and immediately remove from heat.
Pour over the chocolate, and whisk until smooth. Stir in the rum.
Let cool to room temperature, then refridgerate for 15 minutes until the ganache is set. Whisk with an electric beater until light and fluffy.

Mint Chocolate Ganache Glaze


6 ounces semisweet chocolate chips
3 ounces mint chocolate
1 cup heavy cream
1/2 tablespoon peppermint extract

Place all the chocolate into a medium bowl. Heat the cream in a small sauce pan over medium heat. Bring to a boil and immediately remove from heat.
Pour over the chocolate, and whisk until smooth. Stir in the peppermint extract.
Let cool to room temperature. Pour over cake, starting in the center and using a spatula to work the glaze outward.


Mint Chocolate Birthday Cake for Kevin!

Last Thursday was Kevin's birthday and he asked me to make him a mint chocolate cake! I was surprised to find that this vegan cake recipe is so incredibly good! The ganache/frosting we used, while not vegan, was the perfect complement. This cake was great with a scoop of vanilla ice cream. No pictures this time, we were too busy enjoying Kevin's birthday (and the cake)!

3 cups all purpose flour
1/2 cup unsweetened cocoa powder
2 teaspoons baking soda
1 teaspoon salt
2 cups cold water
2 cups sugar
3/4 cup vegetable oil
1 tablespoon vanilla extract
1/2 tablespoon peppermint extract
1 1/2 cups (about 10 ounces) mint-flavored chocolate chips

Preheat oven to 350°F. Grease and flour three 9-inch-diameter cake pans with
1 1/2-inch-high sides. (Or take things easy on yourself and use greased parchment paper!)
Sift flour, cocoa powder, baking soda and salt into medium bowl.
Mix 2 cups cold water and sugar in large bowl until sugar dissolves. Mix in oil, vanilla extract, and mint extract. Whisk in dry ingredients. Divide cake batter among prepared pans.
Bake cakes 25-30 minutes. Cool cakes in pans. Cut cakes around edges of pan. Turn cakes out onto racks and cool completely.